这个库比较新,试一下:https://github.com/hbldh/bleak
用这个库写了一个小工具可以体验一下:BLE-Security-Tool

扫描周围蓝牙设备

1
2
3
4
5
6
7
8
9
import asyncio
from bleak import BleakScanner

async def scan_devices():
devices = await BleakScanner.discover()
#这里可以通过adapter="hci0"指定蓝牙适配器
#例如devices = await BleakScanner.discover(adapter="hci1")
for d in devices:
print(d)

通过 BleakScanner.discover() 扫描出来的结果是一个列表,列表的每个是一个 bleak.backends.device.BLEDevice 类,bleak 的源代码中定义在这里:bleak\backends\device.py

image.png
image.png

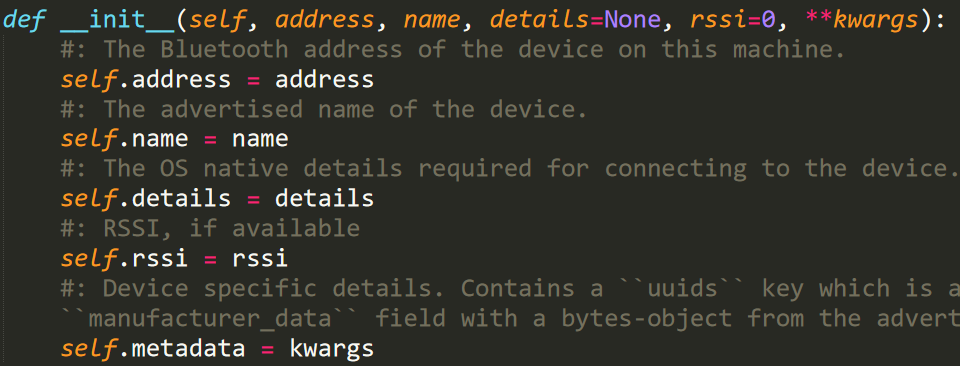
可以看出来每个设备有 address(设备地址,字符串)、name(设备名,字符串)、details(详情,包含了所有的信息,字典)、rssi(信号强度,整数)、metadata(包含服务 UUID 和 manufacturer_data,字典)

连接与断开设备

1
2
client = BleakClient(address,adapter="hci0")#使用adapter指定蓝牙适配器
await client.connect()
1
await client.disconnect()

获取服务与特性

1
2
3
4
5
async def scan_services(address):
async with BleakClient(address) as client:
svcs = await client.get_services()
for service in svcs:
print(service.uuid)

这个 .get_services() 返回的也是一个列表,里面每个都是一个 bleak.backends.bluezdbus.service.BleakGATTServiceBlueZDBus 类,可以用 .uuid 获取 uuid(字符串)

1
2
3
4
5
6
7
8
async def scan_characteristics(address):
async with BleakClient(address) as client:
svcs = await client.get_services()
print("Services:")
for service in svcs:
if service.uuid == "000000ff-0000-1000-8000-00805f9b34fb":
for char in service.characteristics:
print(char.uuid + " --> Handle:" + str(hex(char.handle)))

对于一个服务来说用 .characteristics 获取 characteristic 列表,对于获取到的 characteristic 列表可以遍历出每一个,通过 .uuid 获取 uuid,通过 .handle 获取句柄的值(十进制整数)通过 properties 来获取特性的属性(读写啥的)

读写属性值

获取到之后对于 read 的特征属性可以通过 read_gatt_char(char.uuid) 来获取相应的值
await client.read_gatt_char(char.uuid)
这样读出来是一个 bytearray,使用 value = bytes() 可以转成 bytes

可以通过 write_gatt_char 写相应的值,传递的参数是特征的 UUID 或者句柄
await client.write_gatt_char(0x2b,b'd205303e099ceff44835')
问题是传递的值有时候传字符串,有时候传十六进制,例如 BLECTF 的这一关这一关
关于这俩格式的转换,这个下面的代码可以看出来,所以分成两个函数来用

image.png
image.png

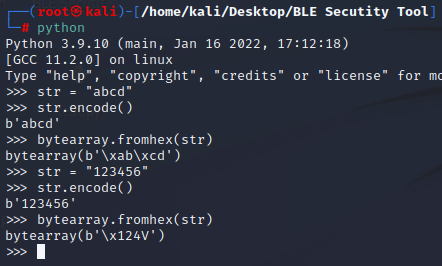
这里写的数据都是可以是这里面的任何一种 bytes, bytearray, memoryview,所以代码中的 #1 这里的 bytes 可有可无

1
2
3
4
5
6
7
8
9
10
11
12
13
14
async def write_value_raw(client,charuuid,value):
try:
value = bytearray.fromhex(value) #1
await client.write_gatt_char(charuuid,value)
print(green("[+]SEND RAW SUCCESS!"))
except:
print(red("[x]ERROR: Can't write value to " + charuuid))

async def write_value_str(client,charuuid,value):
try:
await client.write_gatt_char(charuuid,value.encode())
print(green("[+]SEND STR SUCCESS!"))
except:
print(red("[x]ERROR: Can't write value to " + charuuid))

监听通知或指示

好像是这俩放在一个函数实现了,我确实也可以用这一个函数监听的到

1
2
3
4
5
6
7
8
9
10
11
12
13
14
15
address = "08:3A:F2:B9:85:92"
char_uuid = "0000ff0c-0000-1000-8000-00805f9b34fb"

def callback(sender: int, data: bytearray):
print(f"{sender}: {data}")

async def main(address, char_uuid):
async with BleakClient(address) as client:
print(f"Connected: {client.is_connected}")
await client.start_notify(char_uuid, callback)
await client.write_gatt_char(char_uuid,b"hello")
await asyncio.sleep(5.0)
await client.stop_notify(char_uuid)

asyncio.run(main(address, char_uuid))

start_notify()传入的参数是特征的 uuid,以及回调函数,即监听到之后干啥
想要监听到通知或者指示需要先使能特征值,这个 write 应该就是使能的过程
最后使用 stop_notify(char_uuid) 停止